
If you keep up with me on social media you might know that we have moved into a new place. It’s been three months now and my kitchen is what I chose to start with first! I figured, it’s where I will be spending most of my time from cooking to cleaning up after everyone and so on. I already had the colors I wanted for my accent wall, but no theme. I wasn’t going for a theme really. I knew I wanted a Tiffany Blue color with hints of yellow!
Pinterest has been my best friend lately and where I spend most of my nights, if I’m not on YouTube lol. I came across using letters as decor in the kitchen and fell in love with the idea, since I have extra space on top of my cabinets. I didn’t want to go with the usual way of placing artificial plants that eventually become an extra cleaning chore on my list because of all the dust they accumulate! All over Pinterest everyone used the word “EAT” as the word placement in their kitchen, but I wanted something a little different and more appealing. I came up with using the word “YUM” since it is one of the words Angelo first started saying since speech therapy {happy ^_^ mama!!}.
I went looking online and at different home stores and noticed these letters were a bit pricey and not within my budget. So I decided why not make them myself!? Down below is the list of items I used to create these pretty little things ❤
Items needed:
- 10″ Paper mache letters {they come in different sizes, choose for your liking}
- Rust-Oleum Gloss paint spray {I used the color marigold} I suggest buying “gloss” since it is going to be used in the kitchen and also helps with dust. Make sure it could be used indoors & outdoors & on any ideal surface.
- Paper or cardboard to protect the surface you will be spray painting on
Directions:
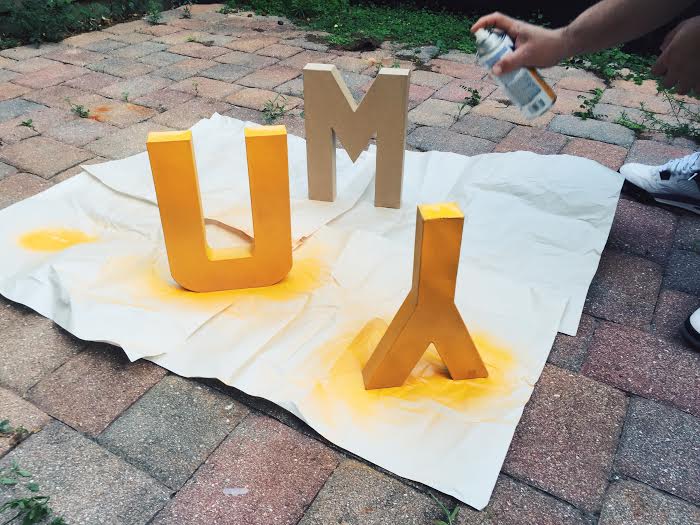
You will need to remove any price tags on your paper mache letters. Place your paper or cardboard box laid flat on the ground. I suggest doing this outside since the smell of spray paint is pretty strong.
 Lay your letters out on top of the surface you are using to spray paint and start spray painting through each letter in every angle covering as much of the letter as possible. Let dry for about 10 minutes. Spray once again making sure all areas are completely covered. Let dry for 24 hours to make sure letters are completely dry. You don’t necessarily need to wait the full 24 hours but I suggest doing so since the spray paint does take some time to fully dry. It may look dry, but once you stick a finger in it and dent the paint in a bit your basically left with a screwed up letter.
 On the next day, flip the letters over to the part that was left unpainted since it was standing on that end. Start spray painting the non-colored area and let dry for 10 minutes. Re-paint the area and let dry for 24 hours. After a complete dry your paper mache letters are left to be a beautiful new decor piece added to your kitchen for half the price!
 FYI: I bought the paper mache letters at Hobby Lobby when they were BOGO 50% OFF! Stick to coupons and sales & you shouldn’t spend much on them! The Rust-Oleum I found at Walmart for way cheaper than other stores.
I hope you all enjoyed this DIY and please share if you tried yourself!
XOX
Dee ❤

Great idea!
LikeLike
Thank you! Your blog is amazing!
LikeLiked by 1 person
Aw thanks so much!
LikeLike